

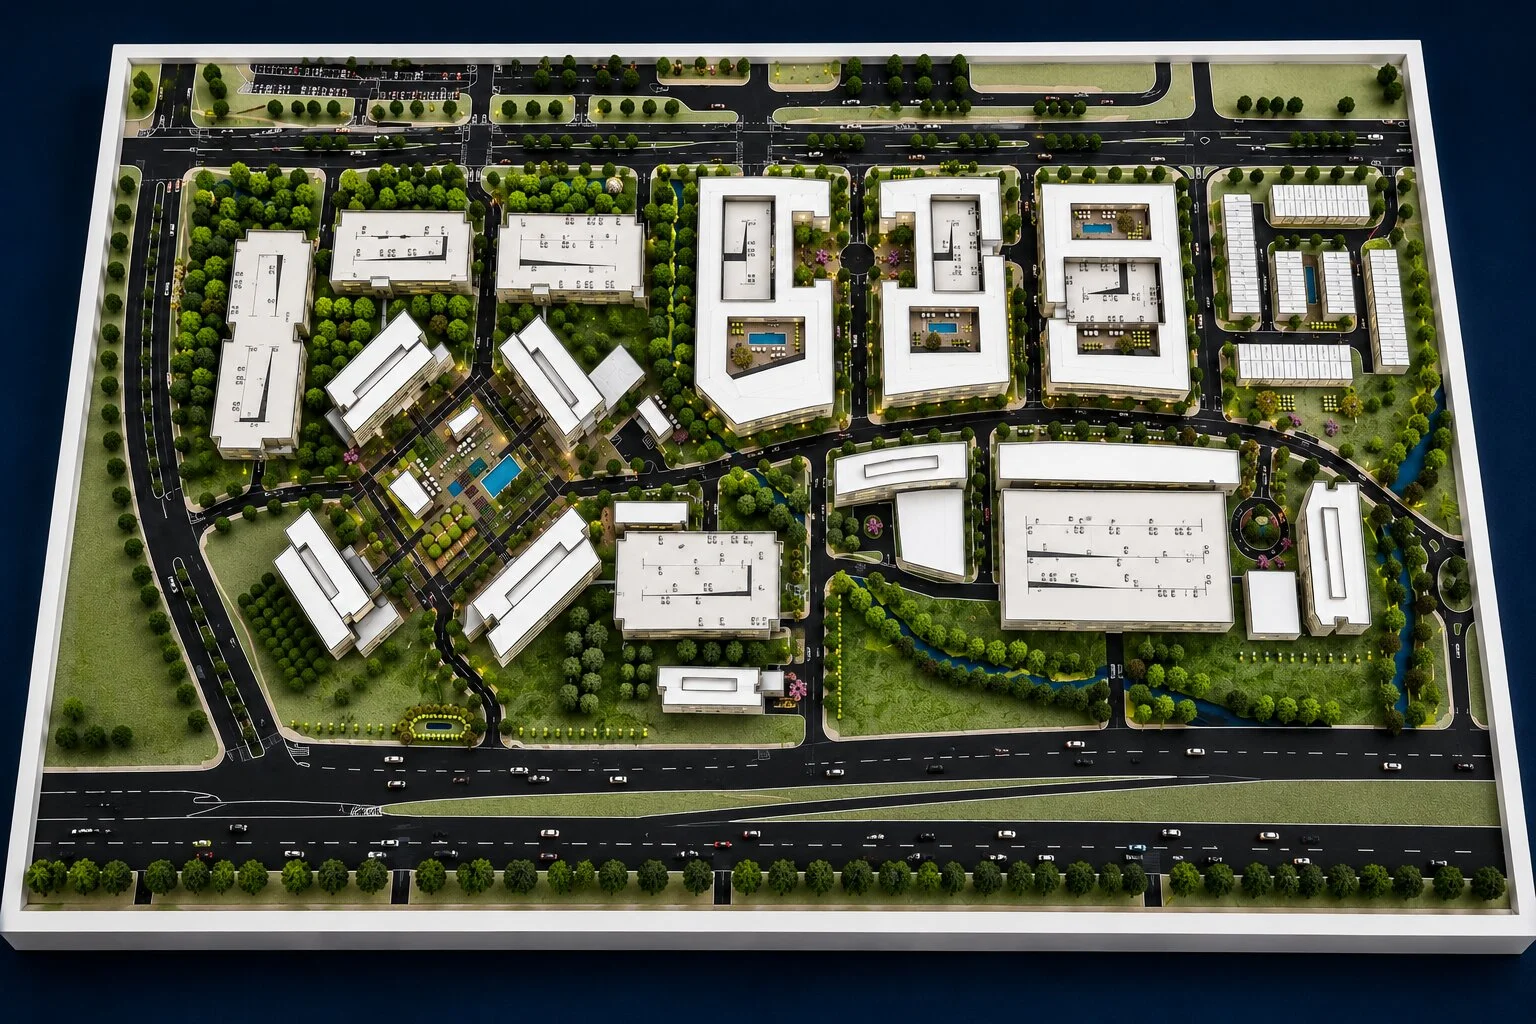

Walk into any sales gallery for a new residential project and watch where people end up standing. It is rarely at the brochure rack, and it is not at the laptop running the 3D walkthrough. They gather around the table in the middle of the room, usually with a phone out, pointing at a tiny tower and asking which one is theirs.
That small table is doing a lot of work. A real estate scale model gives buyers something no rendering can fully offer: a sense of size, distance and neighbourhood, all visible in a single glance. For developers in India, where most flats are sold before the first brick is laid, that quick understanding often decides whether a visitor books a unit or leaves with a brochure and a promise to think about it.
This article looks at why physical models keep earning their place in sales offices, what makes a good one, and how to plan the process without wasting money or time.
What a buyer sees that a brochure hides
Floor plans are good at showing rooms. They are poor at showing everything around the rooms. A buyer looking at a 2D layout cannot easily tell whether the balcony faces the parking lot or the garden, how close tower C stands to tower B, or how much sky is left once the neighbouring plot gets built up.
A physical model answers these questions without anyone saying a word. People lean in, tilt their heads, and look at the project from angles a camera never offered them. Someone who plans to buy on the ninth floor can bend down to roughly that height and check the view. Parents see how far the play area is from their block. Elderly relatives spot the lift cores and work out the walking distances.
There is also a trust factor that is hard to measure. Renders can be polished until every surface looks flawless, and buyers know it. A model built by hand, with real thickness and real shadows, feels harder to fake. It sits in the room as proof that the project is serious enough to have been built, in miniature, before the real work starts.
Scale, materials and the details that matter
Most sales-gallery models are built between 1:100 and 1:300, depending on the size of the project. A single tower with a few amenities can look great at 1:100, where balconies, railings and window frames are visible. A township with twenty buildings usually needs 1:250 or 1:300 to fit on a table people can walk around.
Materials matter more than clients expect. Acrylic sheets are common for the building bodies because they cut cleanly and take paint well. Wood, foam board and resin turn up in terrain, landscaping and smaller parts. Lighting is where a model comes alive: tiny LEDs inside apartments, along roads and around the clubhouse make an evening view possible, and that is often the picture buyers remember.
When you brief a maker for a real estate scale model, list the things that must be accurate to the drawings and the things that can be simplified. Facade patterns, tower heights, road widths and amenity locations should follow the approved plans closely. Tree species and car models can be left to the craftsman’s judgement. A clear brief at this stage saves long email chains later.
Where a model works hardest in the sales process
The obvious spot is the centre of the sales gallery, but there are other uses worth thinking about. Models travel well to property expos, where a stall has about thirty seconds to stop a visitor walking past. A compact version, sometimes with removable towers, can sit in a channel partner’s office and keep the project in front of agents who talk to buyers every week.
Models also help during approvals and investor meetings. When a panel of officials or funders looks at a site plan, a physical layout lets them see height transitions, setbacks and open areas with far less explanation. Some developers keep an unpainted study model during the design stage, change it as plans evolve, and commission the final presentation model only when the layout is frozen.
Sales teams often say that a model changes the tone of the conversation. Instead of reading from a script, the executive points to a tower and lets the visitor ask questions. The discussion becomes more relaxed, more specific, and usually longer. Longer conversations tend to end in site visits.
Mistakes that cost developers money
The most frequent error is ordering the model too late. Developers sometimes finalise the layout in the same week they plan to open the gallery, then expect a finished piece in ten days. Good models need time, and rushing leads to visible shortcuts: crooked railings, uneven paint, lights that flicker.
Another problem is changing the plan after work has started. A shifted tower or a new amenity block may look like a minor edit on a drawing, but on a model it means cutting new parts and redoing the base. Freeze the layout before production begins, or at least be upfront that changes will cost extra.
Some clients pick a scale that is too small to save money, then discover that the detail they wanted does not fit. A model that is cheap but unreadable does more harm than no model at all. Many also forget about transport and handling. Large models are built in sections, and the gallery needs a plan for where the table goes, how the parts enter the building, and who will assemble them on site.
Maintenance gets overlooked too. Dust settles, acrylic gets scratched, bulbs fail. A simple cover and a cleaning routine keep a model looking new for years.
Budget and timeline: what to expect
Costs vary with size, scale, level of detail and lighting. As a rough guide, a single-tower model with basic landscaping can be ready in three to four weeks, while a large township with full lighting, a contoured base and moving elements may need eight to ten weeks. Prices follow the same pattern. A compact tabletop model is a modest line item in a marketing budget; a large walk-around display is closer to the cost of a good hoarding campaign.
When you compare quotations, look beyond the final number. Ask what is included: the base, the display case, lighting, transport, installation, and any touch-ups after the first month. A lower quote that leaves out the case or the lights is not really lower.
If you are planning a model for a launch date, work backwards. Allow a week for drawing review, a week for sample approval, the production period, and a few extra days for shipping and set-up. That buffer is cheap compared with the cost of opening a gallery with an empty table.
Choosing the right maker
Portfolio photos are useful, but a conversation tells you more. Ask who will actually build your model, how many similar projects they have completed, and whether they can share contact details for a past client. A studio that works only on architectural projects will usually read drawings faster than a general craft shop.
Visit the workshop if you can. You will learn plenty from seeing how parts are cut, how paint is applied and how the team handles quality checks. Ask about revisions and what happens if a part gets damaged in transit. Reliable makers answer these questions without hesitation.
Pal Design Models has worked on residential, commercial and mixed-use layouts for developers across India, and teams that want to see finished work can look through the studio’s real estate scale model projects before sending a brief. Whichever studio you shortlist, ask for a small sample part, such as a tower section with window detail, before approving the full build.
Getting your drawings ready
Makers work from what you send, so the quality of the input shapes the result. Send the approved site plan, tower plans and elevations, along with the landscaping layout and any amenity drawings. CAD files are best, but clean PDFs work too if they are drawn to scale. Mention the north direction and the road names so the model can be oriented properly. If the gallery has a fixed table size, share it, because the base should be designed to fit with enough room for people to stand around it.
Colour references help more than people expect. A swatch or a photograph of a finished building tells the maker what shade of grey or beige you actually mean. Without it, you may find that your warm white turns out cooler in acrylic than it looked on screen.
None of this means you should drop digital tools. Walkthroughs and virtual tours are useful for interiors and for buyers who live abroad. The best galleries combine both: a model to understand the project as a whole, and a screen to step inside a sample flat. They support each other.
Final thoughts
A model will not replace good design, honest pricing or timely delivery. What it does is make a project easy to understand, and easy to talk about. For buyers who have never read a site plan, that clarity counts for a lot.
If you are planning a launch in the coming months, start the model conversation early, share complete drawings, and keep the brief simple. The result will sit in your gallery for years, quietly answering questions while your team talks to the next visitor.